Recometic Recometic

Help Center & Guides

Official setup guides, app documentation, and integration tutorials.

Recometic Loyalty & Reviews: Comprehensive Guide

Welcome to your Recometic hub. This guide details how the loyalty rewards, user-generated content (UGC), referral engine, and sync integrations work together to maximize your customer retention.

Performance & Security Architecture: Recometic is built exclusively using Shopify's modern App Blocks and Customer Account UI Extensions. There is zero theme liquid code injection, no residue left on uninstallation, and zero render-blocking JavaScript, ensuring your storefront loading speed remains completely unaffected.

1. Front-End Loyalty & Brand Wallet

The core customer experience is integrated directly into your checkout flow and storefront accounts:

  • Brand Wallet Widget: When a customer enters their email during checkout, the widget instantly displays their point balance, active tier benefits, and available rewards.
  • Seamless Redemption: Customers can convert points to discount codes and apply them to their order with a single click directly within the checkout flow.
  • Storefront Accounts: Customers can check their VIP status, view point histories, and copy referral links from their customer account portal.

2. VIP Tiers & Dynamic Multipliers

Keep customers consolidating their spending with your brand through tiered rewards configured in your Rules tab:

  • Automated Upgrades: Customers are dynamically promoted to higher tiers (e.g., Bronze, Silver, Gold, Platinum) as their lifetime points balance grows.
  • VIP Point Multipliers: Reward higher spending. For example, a Gold tier member can earn 1.5x points per dollar spent compared to a standard member.
  • Campaign Stacking: Launch temporary multipliers in the Campaigns tab (like a "Double Points Weekend"). These stack automatically with the customer's permanent VIP multiplier.

3. Incentivized UGC & Product Reviews

Transform transactional reviews into high-converting social proof by rewarding photo and video submissions:

  • Tiered Point Rewards: Reward customers dynamically based on the depth of the content they upload (configurable in your rules). For example:
    • ✍️ Text-Only Review: E.g., +50 points
    • 📸 Photo Review: E.g., +150 points
    • 🎥 Video Review: E.g., +300 points
  • Delta Anti-Abuse System: Automatically adjusts points when customer reviews are upgraded. For example, if a customer initially leaves a text-only review (+50 pts) and later uploads a photo (+150 pts), the system calculates and awards only the delta difference (+100 pts) to prevent double-dipping.
  • Auto-Dispatched Reminders: Post-purchase review request emails are sent automatically after orders are fulfilled, based on the delay settings in your rules.

4. Referral & Viral Growth Engine

Acquire new customers by incentivizing existing customers to share your brand with their friends:

  • Cryptographic Referral Codes: Recometic generates unique, encrypted referral links for every loyalty member, visible directly in their Brand Wallet widget.
  • Friend Discount: Friends clicking the referral link receive an instant, single-use discount code to apply to their first checkout.
  • Referrer Escrow Protection: To prevent fraud and customer self-referrals, referrer rewards are placed in an escrow status and are only credited to their wallet once the friend's order is marked as fulfilled.

5. Billing & Pricing Plans

Recometic has a zero-feature-gating policy. Every feature (VIP rules, reviews, referrals, integrations, feeds) is fully unlocked on all plans, including the free tier. You only scale by the volume of monthly orders processed:

Plan Tier Monthly Cost Included Orders Metered Overage Maximum Monthly Cap
Starter $0 50 orders N/A (App pauses) $0 (Free forever)
Bronze $29 1,000 orders $0.07 / order $134
Silver $89 4,000 orders $0.04 / order $299
Gold $199 10,000 orders $0.02 / order $599
Platinum $399 25,000 orders $0.01 / order $1,000
Enterprise Bespoke 25,000+ orders Volume-based pricing Custom terms

Note: Billing is processed securely via the Shopify Billing API on a rolling 30-day cycle. Starter plans automatically pause if they exceed 50 orders in a cycle to prevent unexpected usage. Upgrade to a paid plan at any time to keep running.

6. Synced Ecosystem & Integrations

Extend the power of Recometic across your marketing tech stack using our built-in sync features. Learn how to configure these in the other tabs of this Help Center:

  • Klaviyo & Mailchimp: Sync profile properties and trigger automated email flows instantly based on customer actions (e.g., points earned, VIP upgrades).
  • Direct SMTP/Transactional APIs: Connect custom domains using SMTP, Resend, or SendGrid to send review requests directly from your own email server.
  • Shopify Customer Segments: Natively write loyalty data to standard metafield definitions so you can build cohorts and launch campaigns using Shopify Email.
  • Google & Meta Shopping Feeds: Generate XML feeds to display your product review stars on Google Shopping ads, Google Free Listings, and Instagram/Facebook Shops.
Connecting Klaviyo Flow Integrations

Recometic publishes instant event metrics directly to your Klaviyo profile database. You use these metrics to trigger automated emails styled inside your Klaviyo dashboard.

Step 1: Create a Klaviyo Private API Key

  1. Log into your Klaviyo Dashboard.
  2. Click your profile name in the bottom-left corner and go to Settings > API Keys.
  3. Click the Create Private API Key button.
  4. Provide Full Access permissions for Events, Profiles, and Metrics.
  5. Copy the generated key, open your Recometic dashboard, navigate to Settings > Integrations > Klaviyo, paste the key, and click Connect.

Step 2: Available Custom Events & Triggers

The following metric events are pushed instantly by our system. Use these as your flow entry triggers:

Recometic: Review RequestTriggered when an order is completed/delivered to request a product review.
Recometic: Review Follow-UpTriggered as a secondary reminder if the customer hasn't submitted a review.
Recometic: Points EarnedTriggered instantly when points are credited for a purchase or activity.
Recometic: Points DeductedTriggered instantly when points are deducted or manually reverted from a customer's wallet.
Recometic: Tier UpgradeTriggered when a customer crosses a lifetime points threshold to enter a new VIP tier.
Recometic: Referral InviteTriggered when an existing customer shares an invitation code with a friend's email.
Recometic: Points ExpiringTriggered when a customer's points are close to expiring to encourage redemption.
Recometic: Points ReminderTriggered automatically on the recurring interval delay to remind customers of their points balance.
Recometic: Birthday RewardTriggered when a customer's birthday occurs and points are deposited to their wallet.

Step 3: Build the Automation Flow

  1. In Klaviyo, click Flows > Create Flow > Create From Scratch.
  2. Set the trigger type to Metric.
  3. Select Recometic: Review Request (or another metric) from the dropdown list.
  4. Set Timing Delays: Drag a Time Delay block from the actions sidebar and place it right after the trigger. Configure it to wait 7 to 10 days to let the customer receive and use their product. (Do not add a delay block for the Points Reminder flow, as the app handles the scheduling).
  5. Drag an Email action block right under the delay block to build your campaign template.
Important Note on Points Reminder: The Reminder Interval (Days) is calculated and controlled by our app's background scheduler. When the interval is met (e.g. every 90 days), the app automatically pushes the Recometic: Points Reminder event to Klaviyo. Inside Klaviyo, you should trigger your flow on this event and send the email instantly (do not add any Time Delay block for this specific flow).

Step 4: Mapping Dynamic Variables

You can personalize your Klaviyo emails by copying and pasting these exact variables directly into your email text fields or button URLs:

Review Request & Follow-Up:
  • {{ event.customer_name }} — Customer's name
  • {{ event.product_name }} — Product purchased
  • {{ event.points_amount }} — Reward points offered
  • {{ event.review_url }}Submit review link
Loyalty & Referral Events:
  • {{ event.points_earned }} — Points credited
  • {{ event.points_deducted }} — Points deducted
  • {{ event.reason }} — Reason for points transaction
  • {{ event.points_balance }} — Current wallet balance
  • {{ event.tier_name }} — New VIP tier earned
  • {{ event.referrer_name }} — Friend who sent invitation
  • {{ event.referral_code }} — Friend's discount code
  • {{ event.discount_amount }} — Discount amount
  • {{ event.expiry_date }} — Points expiry warning date
  • {{ event.store_name }} — Your store name
  • {{ event.store_url }} — Your store URL
Important Note on Referral Invitations: When a customer refers their friend by entering their email in the storefront widget, the app triggers the Recometic: Referral Invite event. Recipient: The event is fired for the Friend's email address. Klaviyo/Mailchimp will automatically target the friend's email with this flow/tag. Referrer: The name of the customer who sent the invitation is stored in {{ event.referrer_name }}.
Important CTA Placement: Add a primary button block (like "Submit Your Review") inside your Klaviyo template, click the button settings, and paste {{ event.review_url }} directly into the Link URL field. This directs customers straight to their review page.

Step 5: Synced Profile Properties

Whenever a customer triggers an event, Recometic also automatically syncs and updates the following custom properties directly onto their Klaviyo profile, which you can use for audience segmentation or manual campaign personalization:

  • Recometic Loyalty Point Balance — The customer's exact wallet balance.
  • Recometic VIP Tier — Their current VIP status level (e.g. Gold).
  • Recometic Lifetime Points — Total points they have earned all-time.
  • Recometic Total Reviews — Total number of published product reviews.
  • Recometic Referral URL — Their unique referral link to share with friends.
  • Recometic Date of Birth — Customer's recorded date of birth (MM-DD).

Connecting Mailchimp Customer Journeys

Mailchimp triggers campaigns based on audience tagging. When a loyalty event takes place in Recometic, we update the customer profile in Mailchimp and add corresponding tags.

Step 1: Link Mailchimp API Key

  1. In Mailchimp, click your profile and select Account > Extras > API Keys.
  2. Click Create A Key and copy the generated token string.
  3. Go to Recometic Settings > Integrations > Mailchimp, paste the API key, and click connect.

Step 2: Automate with Tag-Added Triggers

Recometic attaches the following tags to contact profiles in Mailchimp during transactional events:

🏷️ Review Invitation: Recometic: Review Request
🏷️ Wallet Balance Update: Recometic: Points Earned
🏷️ Wallet Balance Deduction: Recometic: Points Deducted
🏷️ VIP Milestone: Recometic: Tier Upgrade
🏷️ Referral Invitation: Recometic: Referral Invite
🏷️ Points Expiry Warning: Recometic: Points Expiring
🏷️ Recurring Points Reminder: Recometic: Points Reminder
🏷️ Birthday Reward: Recometic: Birthday Reward

Step 3: Design the Mailchimp Journey

  1. Go to Mailchimp Automations > Customer Journeys and click Create Journey.
  2. Choose the starting trigger as Tag Added.
  3. Select the tag Recometic: Review Request (or another tag).
  4. Drag a Time Delay block (e.g. wait 7 days) and place it under the tag trigger. (Do not add a delay block for the Points Reminder tag trigger, as the app handles the scheduling).
  5. Insert a Send Email block below the delay block to compose your email.
Important Note on Points Reminder: The Reminder Interval (Days) is calculated and controlled by our app's background scheduler. When the interval is met (e.g. every 90 days), the app automatically applies the tag Recometic: Points Reminder to the Mailchimp contact. Inside Mailchimp, you should trigger your customer journey flow on this tag and send the email instantly (do not add a Time Delay block for this specific journey).

Step 4: Synced Profile Merge Fields

Whenever a customer triggers an event, Recometic updates the following merge fields on their Mailchimp contact profile to help you personalize newsletters or target segments:

  • RC_POINTS — The customer's exact wallet balance.
  • RC_TIER — Their current VIP status level (e.g. Gold).
  • RC_LTIME — Total points they have earned all-time.
  • RC_REVS — Total number of published product reviews.
  • RC_REFURL — Their unique referral link to share with friends.
  • RC_DOB — Customer's recorded date of birth (MM-DD).

Direct Sending Channels (SMTP/Resend/SendGrid)

If you prefer not to use third-party marketing automation platforms, Recometic compiles and dispatches emails directly using the HTML editors built into the settings page.

Step 1: Select Your Protocol Gateway

Option A: Custom SMTP Credentials

Provide host connection parameters inside a JSON config object inside the integration form:

{ "host": "smtp.yourserver.com", "port": 587, "secure": false, "user": "mail@yourdomain.com", "pass": "your_smtp_password" }
Option B: Resend / SendGrid API

Simply enter your API Key or Authorization Token into the corresponding gateway field. Make sure your authenticated sender email domain matches the verified email domain in your Brand profile settings.

Step 2: Customize Delivery Delay

Because emails are delivered directly from our server without external flows, timing delays and reminder intervals are configured inside the Edit modal for each respective email template:

  1. Navigate to the Settings page and scroll to Email Templates.
  2. Click Edit Template on the Review Request, Review Follow-Up, or Points Reminder templates.
  3. Configure the delay duration (in days) or the recurring interval (in days) directly in the form.
  4. Our app runs background jobs periodically to check these intervals and dispatch your direct emails automatically.

Step 3: Customizing Templates

Go to Settings > Email Templates to modify subject lines and HTML bodies. You can copy/paste these dynamic tags:

{{customer_name}} {{referrer_name}} {{product_name}} {{points_amount}} {{points_earned}} {{points_deducted}} {{points_balance}} {{reason}} {{tier_name}} {{store_name}} {{referral_code}} {{discount_amount}} {{expiry_date}} {{store_url}} {{review_url}}

Shopify Customer Segments

Recometic natively syncs loyalty data to Shopify's Customer Metafields. This allows you to build powerful Shopify Customer Segments based on points and tiers to send marketing emails via Shopify Email, or any other app that integrates with Shopify segments.

Step 1: Verify Metafield Setup

Recometic automatically provisions these custom metafields on your customers during app installation:

Definition Name Namespace & Key Type Description
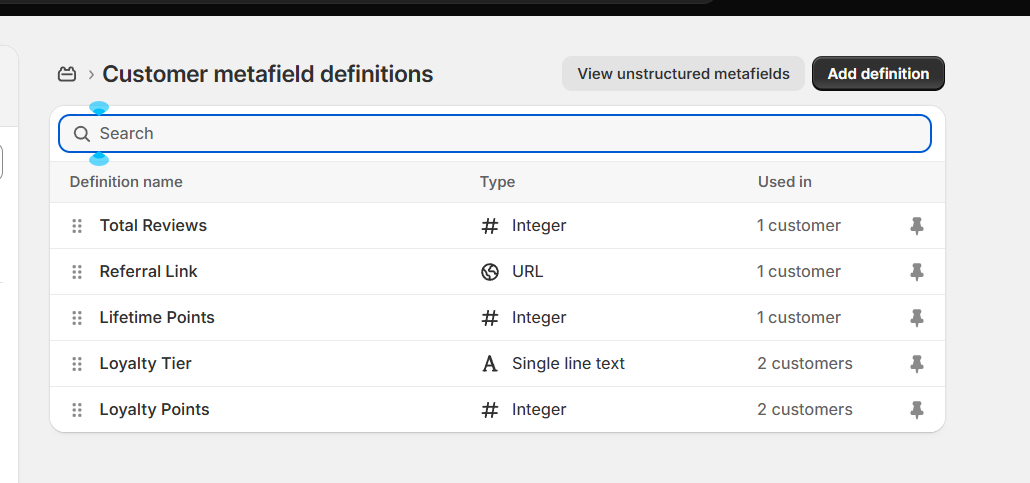
Loyalty Points custom.loyalty_points # Integer Tracks the customer's exact wallet balance.
Loyalty Tier custom.loyalty_tier A Single line text Tracks the customer's current VIP level (e.g., Gold).
Lifetime Points custom.loyalty_lifetime_points # Integer Total points earned over the lifetime.
Total Reviews custom.loyalty_total_reviews # Integer Total published product reviews.
Referral Link custom.loyalty_referral_link URL Unique customer referral URL.
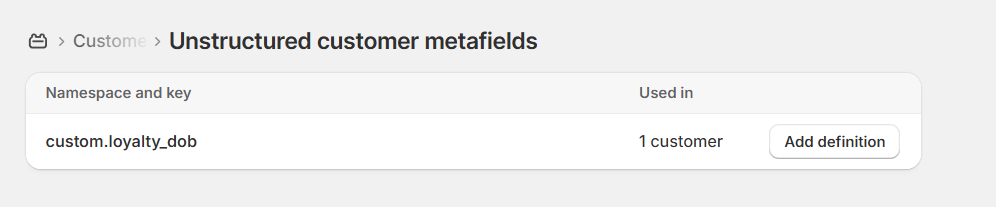
Date of Birth custom.loyalty_dob Date Tracks customer date of birth for birthday rewards.

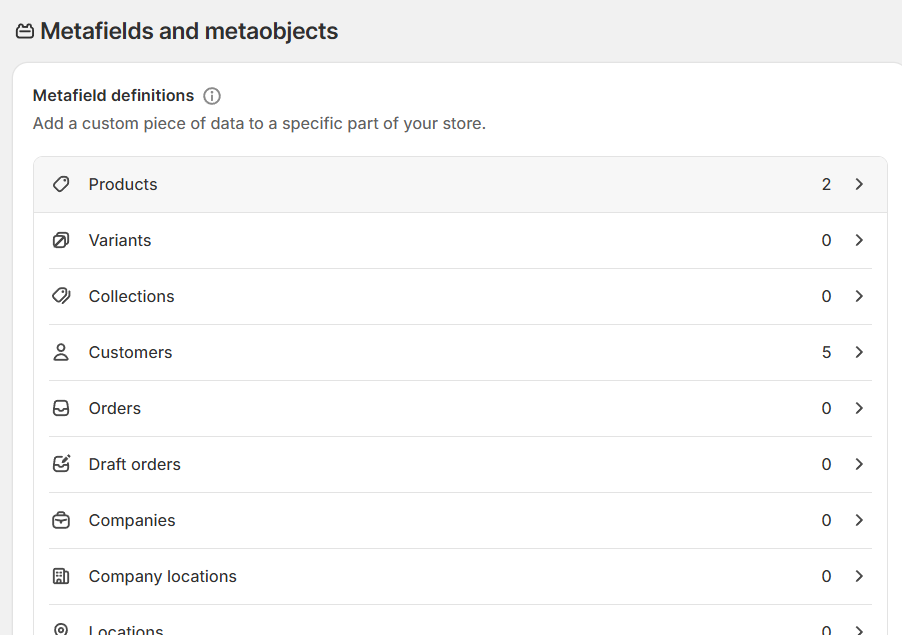
You can verify these definitions exist by going to your Shopify Admin, clicking Settings > Metafields and Metaobjects > Customers.

Manually Creating Metafields:

If you need to create these metafield definitions manually, follow these steps:

  1. Go to your Shopify Admin and navigate to Settings > Metafields and metaobjects, then click on Customers. Shopify Metafields and metaobjects settings
  2. On the Customer metafield definitions page, click the View unstructured metafields button. Customer metafield definitions page
  3. In the Unstructured customer metafields list, locate the relevant metafield namespace and key (e.g., custom.loyalty_points) and click Add definition. Unstructured customer metafields list
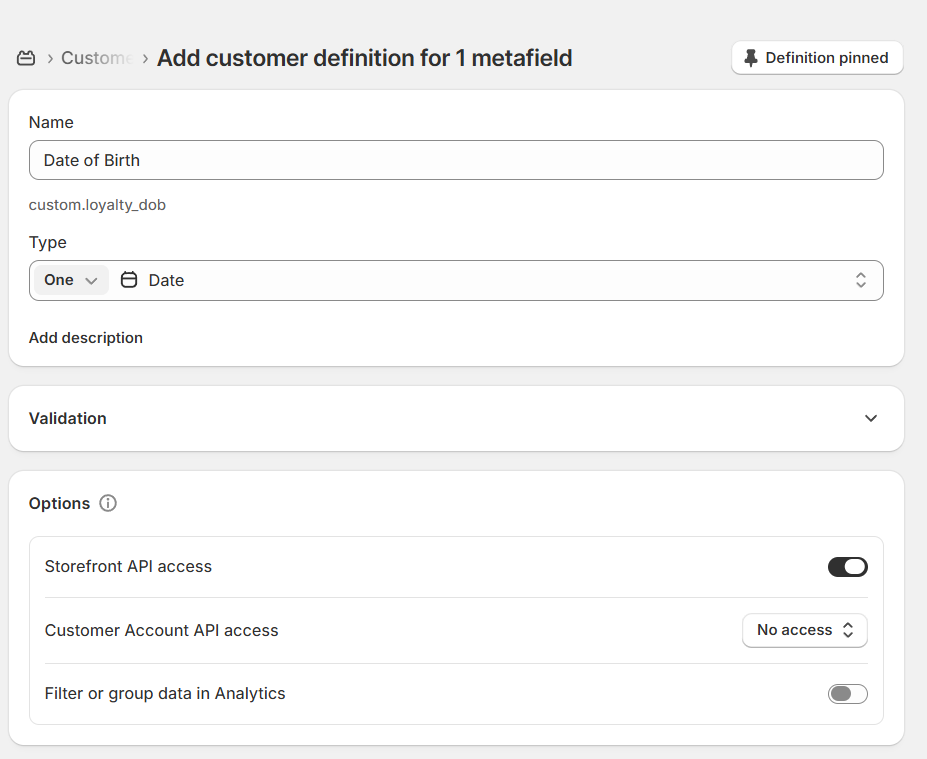
  4. Fill out the definition details (Name and Type) and click Save. Add customer definition for 1 metafield

Important: Ensure you select the correct Type and choose One (not list of values). For Points and Reviews, choose Number → Integer. For Tier, choose Single line text. For Referral Link, choose URL. For Date of Birth, choose Date.

Step 2: Create the Segment

You can filter your customers directly inside the Shopify admin using these metafields.

  1. In your Shopify admin, navigate to Customers > Segments.
  2. Click the Create segment button.
  3. Depending on which version of the segment builder your store uses, follow one of the methods below.
Method A: Shopify Magic (AI)

If you see a "Describe your segment" box with a robot icon, simply type in plain English:

Customers with more than 500 loyalty points and a loyalty tier equal to 'Gold'

Hit enter, and Shopify will automatically write and execute the code for you.

Method B: Dropdown Menu

If your text box appears frozen or rejects raw code pastes, build the query manually:

  • Click into the empty Search customers box to open the dropdown menu.
  • Scroll down and select Customer Metafields (or type it to search).
  • Select custom.loyalty_points or custom.loyalty_tier.
  • Select your operator (e.g., >= or =).
  • Type your value (e.g., 500 or 'Gold') and hit Enter.
Method C: ShopifyQL Advanced Editor

If you prefer writing SQL, you can use the advanced query notebook. Paste this exactly:

FROM customers SHOW customer_name, email_subscription_status, date_customer_updated WHERE metafields.custom.loyalty_points > 500 AND metafields.custom.loyalty_tier = 'Gold'

Step 3: Personalizing Shopify Email Campaigns

When sending a campaign via Shopify Email to your segments, you can dynamically display each customer's loyalty data by inserting standard Liquid tags.

Inside the text or HTML blocks of your Shopify Email template, insert the following Liquid variables:

  • Current Points Balance: {{ customer.metafields.custom.loyalty_points }}
  • Current VIP Tier: {{ customer.metafields.custom.loyalty_tier }}
  • Lifetime Points: {{ customer.metafields.custom.loyalty_lifetime_points }}
  • Total Reviews: {{ customer.metafields.custom.loyalty_total_reviews }}
  • Referral Link: {{ customer.metafields.custom.loyalty_referral_link }}
  • Date of Birth: {{ customer.metafields.custom.loyalty_dob }}
Example usage: "Hi {{ customer.first_name }}, you currently have {{ customer.metafields.custom.loyalty_points }} loyalty points in your wallet and are a {{ customer.metafields.custom.loyalty_tier }} member! Shop our new collection now to redeem your rewards."

Google & Meta Shopping Feeds

Sync product reviews and star ratings into Google Shopping Ads, Google Free Listings, and Meta Commerce Manager (Instagram & Facebook Shop).

1. Google Product Ratings (Merchant Center)

Google displays 5-star ratings under your product listings in Google Shopping ads and organic search cards. To connect your live feed:

  1. Log in to your Google Merchant Center account.
  2. Navigate to Marketing > Product Reviews (or Data Sources > Product Ratings).
  3. Click Add Product Review Source and choose Scheduled Fetch.
  4. In your Recometic dashboard under Reviews > Shopping Feeds, copy your Google Product Ratings XML Feed URL.
  5. Paste the URL into Merchant Center, set the fetch frequency to Daily, and save.
Google 50-Review Requirement: Google requires merchants to have at least 50 approved reviews across all products before star badges appear on Shopping ads. Use the live progress tracker inside the app to track eligibility.

2. Meta Commerce Manager (Instagram & Facebook Shop)

Meta dynamically matches customer star ratings to product items in your Facebook & Instagram catalog for dynamic product ads (DPA):

  1. Go to Meta Commerce Manager and select your store Catalog.
  2. In the left menu, click Catalog > Data Sources > Supplemental Feeds.
  3. Click Add Supplemental Feed and select Scheduled Feed URL.
  4. Copy the Meta Product Ratings Feed URL from your Recometic dashboard and paste it.
  5. Set update frequency to Daily and click Upload.

Frequently Asked Questions

Find quick answers to common questions about Recometic.

Customers earn points for purchases and activities. Points are stored in their Brand Wallet and can be redeemed for discounts at checkout.
We support native Klaviyo and Mailchimp integrations, direct SMTP/Resend/SendGrid delivery, and Shopify Customer Segments.
Yes. Recometic natively writes customer loyalty points, VIP tiers, total reviews, referral links, and date of birth directly into Shopify Customer Metafields (e.g. custom.loyalty_points, custom.loyalty_dob). You can then build dynamic segments in the Shopify admin using AI-powered Shopify Magic, standard dropdown filters, or ShopifyQL queries.
Recometic supports real-time event triggers and custom profile properties sync to Klaviyo and Mailchimp. Pushed events include Recometic: Review Request, Recometic: Review Follow-Up, Recometic: Points Earned, Recometic: Points Deducted, Recometic: Tier Upgrade, Recometic: Referral Invite, Recometic: Points Expiring, Recometic: Points Reminder, and Recometic: Birthday Reward (carrying complete metadata like event.points_balance). Additionally, Recometic automatically syncs and updates customer properties (including current point balance, active VIP tier, lifetime points earned, total reviews submitted, unique referral links, and date of birth) directly to Klaviyo profile properties (Recometic Date of Birth) and Mailchimp merge fields (RC_DOB) to power custom segmentation and personalized newsletters.
Recometic generates a dynamic, real-time XML feed for Google Product Ratings (Merchant Center) and Meta Commerce Manager Supplemental Feeds. This allows you to show review star badges on Google Shopping Ads, Google Free Listings, and Facebook/Instagram Shop dynamic product ads (DPA).
No. Recometic is built using Shopify's modern App Blocks and Customer Account UI Extensions. There is zero theme code injection and no render-blocking Javascript, meaning your site load speed remains unchanged.
Yes. Recometic provides native email delivery, but you can also configure your own SMTP servers or connect third-party transactional email APIs like Resend and SendGrid to send emails directly from your custom domain.